The way I work for a creative piece is fairly random, free-cutting
to create the ‘fabric’, which provides a sense of freedom and sometimes the
unexpected appears and leads in another direction. I then look at how each
piece looks, decide where it fits in the assembled pieces to elicit a ‘mood’,
or the falling of light (as in some of my scenes for the ‘backyard series’ for
example, which can be seen on my website), which can be very exciting –
especially when using the variations in hand-dyed fabrics. But it is a very
different process from this brief, as I was to find out.
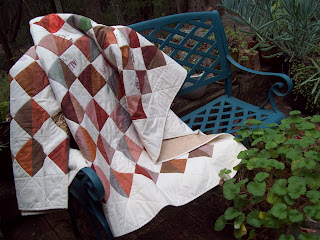
Using lovely hand-dyed fabrics (mostly obtained from ‘Dyed
and Gone to Heaven’) in earthy colours to assemble blocks on spilt triangles
surrounded by the cream seeded home-spun. As I usually do, I simply took the
fabric and started cutting, though this time with a ruler – a big mistake I was
to find out! Thinking I had it cornered, I started by cutting the 4 ½” squares
in half to mix and match the colours. and quartered the square of the cream
background to provide the triangles to go around each corner of the pieced
colour triangles set on diagonal. Trouble was, the coloured triangles were
being joined down the centre on a bias, and the cream corners left all edges of
the block on the bias – horrors!
I do understand and appreciate that there’s a lot to be said
for the beauty of mathematical precision, (especially in engineering) and also
in having all the points butt up perfectly to each other on a quilt. Annoyingly,
creating the blocks had led to each one varying slightly; sure, only by about
an eight of an inch – doesn’t sound much, but just enough to be very
frustrating when joining them! I started to see that problems might be
encountered when joining a bias to a bias, or the external edges of a block
were on a bias – such that each block required re-measuring and trimming in
order to join them to achieve any sort of precision. So, I did have to ‘think
first cut later’ after all – measurement wasn’t all it seemed!
It was the first time I’d used regular blocks for quilt
creation in many years, and I knew there had to be a secret about the cutting
process! I rang my friend Val Nadin, also an art quilter, and of course she had
the answer: use the ‘golden rule’ by adding 1 ¼”(to the finished size) to
create 4 triangles; the outside edge can then be used to join 2 colours down
the centre on the straight to form the lozenge centre of the block. So, the
colours were cut as 7” squares, and quartered diagonally. When the quarters
were joined it resulted in a 4 ½” square made from 2 contrasting colours. Adding 1 ¼” to that, I then cut 5 ¾”
squares in the cream, which when quartered and joined to the 4 corners of the
diamond, produced a block measuring 6 ¼” unfinished, and 5 ¾” when the blocks
were pieced. I know it seems like doing the mathematics back-to-front, and to
an extent that is what I did, because I’d already created quite a number of
blocks (with the bias join down the centre) that I didn’t want to discard.
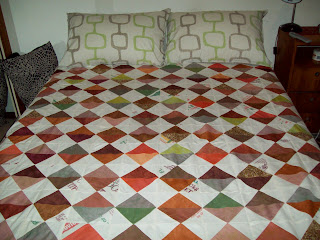
Although Lou’s quilt is geometrically structured, there is
still an element of the ‘random’ in the way the colours fall together within
blocks, and when they come together. This was accentuated by the use of
Australian feed sacks, which are used to package organic grains. The edged
cream pieces with partial text on them come together also came together quite mostly
randomly, with some moves occurring when I laid them out and took a look at the
connections of course!
Although there were several hurdles to be addressed in the
process, and I may not have got it totally right, all in all, I feel the
desired outcome has been achieved: a fairly small overall pattern on a cream
background (with the added interest of text), using earthy colours and tones.
The backing is also very simple and earthy. It is made from all cotton fabrics
and batting is 100% Australian cotton, and looks lovely sitting on the bed,
either horizontally or vertically.


No comments:
Post a Comment